broster
Premium Member
 Registered: 6th Dec 02
Location: Drives: E39
User status: Offline
|
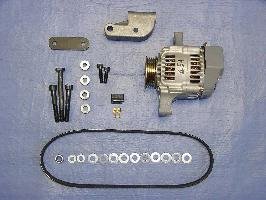
some of you may remember the thread where i posted a tiny alternator....

looks small....
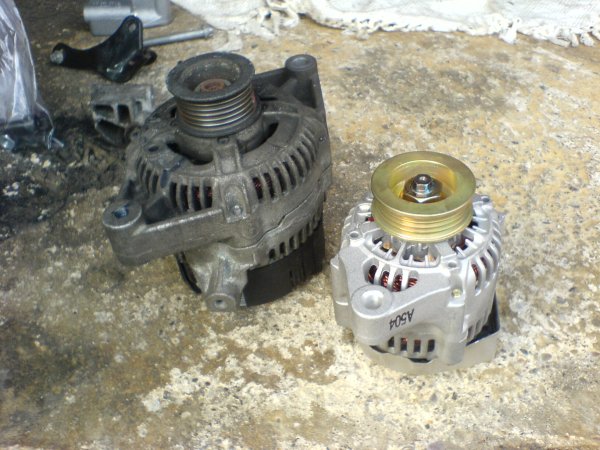
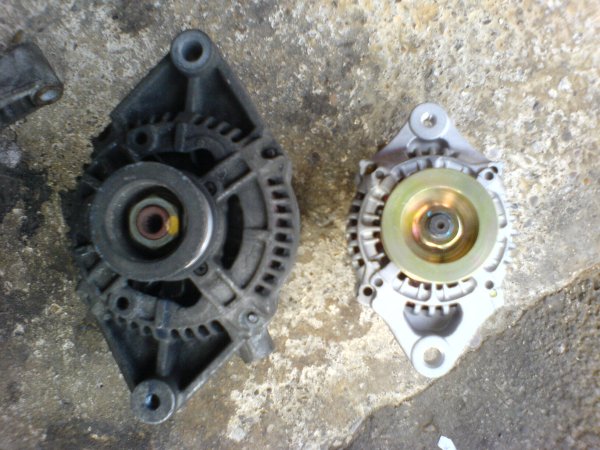
but compared to a standard one its tiny!


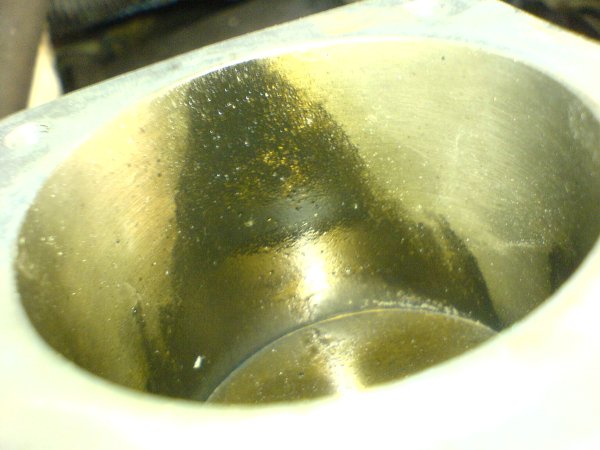
and for fun, heres my throttle bodies, think they have been spitting back a bit....

alternator is bolted up just need to wire it up and im away, also got a new crank shaft sensor to get rid of a miss fire, good old vauxhall did me a good price on that £34!!!! its a magnet!
|
PaulW
Member
Registered: 26th Jan 03
Location: Atherton, Greater Manchester
User status: Offline
|
ooooh i must get one i must i must!!!!
spitback - pah! you know its good when your seeing flames pop out of them when coming off throttle after a good thrash  (well... plus would mean something is fcuked but hey :lol (well... plus would mean something is fcuked but hey :lol
|
MR2Mike
Member
Registered: 20th Jan 05
Location: Old Trafford. Drives: MR2 N/A
User status: Offline
|
that IS amazing broster, better pics this time. lets not ruin this thread. its tiny that isnt it, is it still the same rating as the old one?
|
PaulW
Member
Registered: 26th Jan 03
Location: Atherton, Greater Manchester
User status: Offline
|
also... pulley doesnt just look bigger, but thinner too?? will the belt fit ok or are you also replacing the bottom pulley & fitting a thinner belt???
|
broster
Premium Member
 Registered: 6th Dec 02
Location: Drives: E39
User status: Offline
|
lol, thats on start up, tends to spit back on start up a bit lol......
|
Rileysport
Member
Registered: 18th Jun 04
Location: West Yorkshire
User status: Offline
|
fook thats microscopic 
|
broster
Premium Member
 Registered: 6th Dec 02
Location: Drives: E39
User status: Offline
|
paul its a 4 rib belt, same as the eps belt, i dont have eps and have a 6 tooth belt, got a few plans up my sleeve...... involving a bit of cutting and stuff..... sbd seem to think the plan should work
|
PaulW
Member
Registered: 26th Jan 03
Location: Atherton, Greater Manchester
User status: Offline
|
 please dont tell me your gone chop 2 ribs off the belt?? surely not please dont tell me your gone chop 2 ribs off the belt?? surely not 
|
3CorsaMeal
Member
Registered: 11th Apr 02
User status: Offline
|
wow, thats cool 
whats the weight difference between em?
is it all the same ratings/spec as original or better/worse?
|
PaulW
Member
Registered: 26th Jan 03
Location: Atherton, Greater Manchester
User status: Offline
|
I would like to know how to fit this...


|
broster
Premium Member
 Registered: 6th Dec 02
Location: Drives: E39
User status: Offline
|
similar to original, slightly better... the new one is 2.5kg, not weighted the old one, but it feels 2-3times more....
|
3CorsaMeal
Member
Registered: 11th Apr 02
User status: Offline
|
quote:
Originally posted by PaulW
I would like to know how to fit this...


Proceed as follows:
Remove the dynamo-side locknut and washers, making a note of their arrangement so that they can be replaced in their original positions.
Remove the four magnet-fixing nuts and lock washers from the back of the hub drum, and then remove the four magnet-fixing screws.
Hold the wheel, with the dynamo downwards, just above the work-bench. A few light taps with a mallet on the end of the spindle will cause the dynamo unit to drop out complete.
The magnet spacing ring can now be lifted out of the hub drum.
Unless it is essential to do so, the armature and magnet should never be separated. If they are to be separated, a keeper ring is absolutely necessary, because the magnet will lose some of its magnetism unless there is always iron inside it. Even a moment's separation will cause loss of magnetism, and a spanner placed across the magnet is useless as a substitute for a keeper ring. To separate the magnet and the armature, hold the dynamo unit in the left hand, with the terminal plate against the palm. Then fit a keeper over the armature and lightly tap the keeper with the palm of the right hand. The magnet will slide off the armature and on to the keeper. At this stage it is wise to test the armature with a test meter. If there is no reading on the test meter there is a break in the winding. If a test meter is not available, a battery and bulb may be connected as shown in the diagram, and if the bulb does not light a break in the armature winding is indicated. A second test is to disconnect the lead from one of the armature terminals and touch the outer edges of the armature with the bare lead. If the bulb lights, this indicates a short circuit.
Remove the cone locknut on the left-hand side and unscrew the left-hand cone.
The channel-section dust cap is just a press-in fit and can be prised out with a wide screwdriver (to avoid damage). The ball cage may be lifted out for examinationof the hub bearing surface. If a new ball retainer and balls have to be fitted, it is usually best to fit a new dust cap as well. Both hub cups are part of the hub shell and if either is worn a complete new shell must be fitted.
The spindle may now be pulled out from the dynamo side,together with the right-hand cone. If the bearing surface is in good condition and the spindle threads are sound, there is no need to remove the cone.
The baU cage may be lifted out for examination of the hub bearing surface.
SPECIAL NOTE. - GH6 hubs prior to 1952 had the adjusting cone on the dynamo side. This cone is extended to pass through the armature body and is flatted at the outer end to take (K428) notched adjuster washer, by means of which the cone may be turned. Dismantling instructions from 1 to 5 remain exactly the same as for the current model. For paragraph 6 read 'Unscrew the dynamo-side cone and lift the ball cage out of the hub shell. The spindle may now be pulled out from the other side, together with the fixed cone.' All further comments apply equally to all GH6 hubs.
|
a_j_mair
Member
Registered: 23rd Jan 04
Location: Scotland
User status: Offline
|
wow  that is small far better pics that is small far better pics 
|
3CorsaMeal
Member
Registered: 11th Apr 02
User status: Offline
|
quote:
Originally posted by broster
similar to original, slightly better... the new one is 2.5kg, not weighted the old one, but it feels 2-3times more....
the little wheel/pulley looks a lot wider on one of them, is that a trick of the eye or is it meant to be?
|
Adam-D
Member
Registered: 11th May 02
Location: Cheshire
User status: Offline
|
i need a lambda sensor
vaux qouted me £56
im not payin £56 but i have to have a genuine vaux sensor 
|
broster
Premium Member
 Registered: 6th Dec 02
Location: Drives: E39
User status: Offline
|
the standard pulley is a 6rib belt, the new one is a 4 rib belt.... needs to have some adaption done to make work...
|
3CorsaMeal
Member
Registered: 11th Apr 02
User status: Offline
|
lightweight belts too  
|
broster
Premium Member
 Registered: 6th Dec 02
Location: Drives: E39
User status: Offline
|
wow, imagine the power
|
PaulW
Member
Registered: 26th Jan 03
Location: Atherton, Greater Manchester
User status: Offline
|
broster, please keep me posted on how well this alternator performs! will be interested to know how it does... also, can you get a 6-rib pulley for it?? as will be needing one for what i need!!
adam - scrappy??? would say you could have my old one, but its a 3-wire lambda and you need a 1-wire
|
broster
Premium Member
 Registered: 6th Dec 02
Location: Drives: E39
User status: Offline
|
sbd are looking into the 6 rib bit.....
adam, get one from a motorfactors, costs lots less
|
Jamie Walby
Member
Registered: 15th Nov 04
User status: Offline
|
Thats awesome Broster. Maybe you can allow me to touch it next week 
|
broster
Premium Member
 Registered: 6th Dec 02
Location: Drives: E39
User status: Offline
|
maybe........just maybe
|
a_j_mair
Member
Registered: 23rd Jan 04
Location: Scotland
User status: Offline
|
are you not able to swap the actual pulleys over 
|
broster
Premium Member
 Registered: 6th Dec 02
Location: Drives: E39
User status: Offline
|
nope......
|
Stu_22
Member
Registered: 25th Mar 02
Location: Luton
User status: Offline
|
How much all in I'm thinking of getting one as I have to swap alternators
|


